

Secardeo certEntra Deployment Guide for Web App
1 Introduction
1.1 Purpose of this document
This guide describes the deployment of the Secardeo certEntra software as an Azure App Service in Microsoft Azure. It serves as a guideline for planning, deploying, configuring, and operating certEntra. This document combines the supported Azure deployment methods in a single guide. certEntra can be deployed using the Azure Marketplace, by direct ARM template deployment, or with Terraform. While the individual deployment steps differ depending on the selected method, the required prerequisites and many post-deployment configuration steps are identical. Alternatively, certEntra can also be installed on a Windows Server using the provided executable installer. This deployment model is not covered in this document and is described separately in the certEntra Manual Deployment Guide.
1.2 Functions and architecture
certEntra allows for the central autoenrollment of digital user certificates in the Azure cloud. Typical use cases are
- end-to-end e-mail encryption and signing using S/MIME certificates from a public CA
- certificate based authentication (CBA) of the user
Microsoft Entra ID groups control which users the certificates are enrolled for. The certificates are distributed to the user's devices via Intune. Figure 1 shows the certEntra architecture and its components. certEntra is installed as an Azure web app that is running in Azure. certEntra is using the TOPKI database in Azure SQL, MS SQL or MySQL. To retrieve necessary information from Entra ID, certEntra communicates with your Azure tenant. Permissions for this are configured via an Azure app registration. The credentials for the app registration and optionally private keys are stored in Azure key vault. To enable Intune to push the certificates to the users' devices, a certificate connector is required. Certificates can automatically be published in Exchange Online GAL for internal encryption or in the Secardeo certBox for spontaneous encryption by external partners.

2 Prerequisites
2.1 Backend CA
For the issuance of digital certificates, a Certificate Authority (CA) is required. certEntra supports different Backend CAs. This can be a private CA or a trusted public CA. Currently the following CAs are supported:
- AWS ACM-PCA
- DigiCert CertCentral
- DogTag CA
- D-Trust
- EJBCA
- GlobalSign Atlas
- GlobalTrust SOAP
- OpenXPKI
- Sectigo Certificate Manager (SCM) REST
- SwissSign CMC
- Windows CA HTTP
- TOPKI REST
Please make sure that you prepare for the certEntra configuration in a later step
- required API credentials
- certificate products and profiles
2.2 Database requirements
certEntra stores relevant information about certificates, requests, and configurations in a database. A database connection is always required for certEntra to function. certEntra supports the following database types: Managed:
- Azure SQL (recommended)
- DTU-based purchasing model, Standard tier, DTU set to minimum
- Azure Database for MySQL
Self-hosted:
- Microsoft SQL Server 2016 or higher
- MySQL v9 or higher
Make sure that the storage of the database is sufficient. The database requires ~100 KB per certificate. certEntra supports SQL authentication for all database types. Entra authentication is preferred, but only configurable for managed Azure SQL. Please refer to chapter 5.4 for the database configuration.
2.3 License
certEntra follows a bring-your-own license (BYOL) model. Upon installation, a 90-day demo license is automatically applied for trial usage. To use certEntra productively, a valid license must be provided for continued use. To obtain a serial number for the license, please contact info@secardeo.com. After receiving your serial number, follow the steps described in the certEntra manual to install and activate your license.
2.4 Azure permissions
For the deployment of certEntra, the following permissions are required:
- Global Azure administrator permissions
- Contributor permissions on the selected Azure subscription.
This is only required for the deployment and not for the certEntra configuration according to the manual later.
3 Preparation
3.1 Additional preparation for Azure Marketplace only
Before starting the deployment from the Azure Marketplace, an app registration must be created manually in Microsoft Entra ID. This is required because the Marketplace deployment expects the application identity and related credentials to be provided during deployment.
3.1.1 Create app registration
Create a new app registration in the Azure portal and configure it as a single-tenant application. Detailed documentation from Microsoft can be found here: https://learn.microsoft.com/en- us/entra/identity-platform/quickstart-register-app. The core steps are outlined in the following:
1. Go to your Azure portal and search for "App registrations"
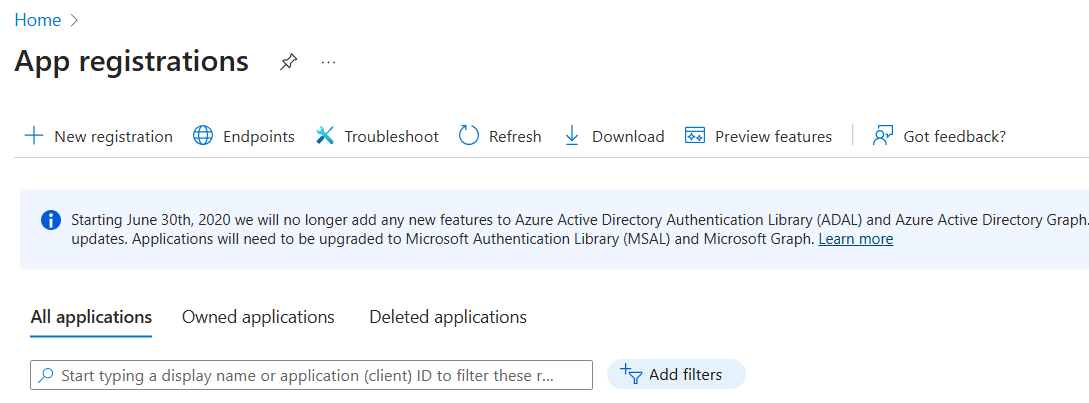
2. Click on "New registration"
3. Choose a name, e.g. "certEntra"
4. Choose "Single tenant only"
5. Click "Register"

3.1.2 Create and record client secret
1. On the newly registered app registration under "Certificates & secrets" -> "Client secrets" click "New client secret"
2. Enter a description, e.g. "certEntra" and choose an appropriate expiration (recommended: 24 months). Click "Add"

3. On the "Certificates & secrets" page under "Client secrets" copy the secret string from the "Value" field. Save this secret to a safe place. It won't be shown again when you leave the page. Save also the Application (client) ID and the Directory (tenant) ID.

3.1.3 Configure API permissions
Next configure the permissions that certEntra will get in your Azure Tenant. In your App registration click on "API Permissions" and perform the following steps:
1. Click "Manage" -> "API Permissions"
2. Click "Add a permission"
3. Select "Intune"
4. Select "Application permissions"
5. Select "pfx_cert_provider"
6. Click "Add permissions"

7. Click "Add a permission"
8. Select "Microsoft Graph"
9. Select "Application permissions"
10. Select "Directory"-> "Directory.Read.All", "Group"-> "Group.Read.All", "GroupMember"-> "GroupMember.Read.All", "User"-> "User.Read.All" ("User.Read" will be delegated), DeviceManagementConfiguration -> DeviceManagementConfiguration.ReadWrite.All
11. If you want certEntra to send notifications through Exchange Online, you should also add the permission "Mail"->"Mail.Send".
12. If you want certEntra to Delegate certificates issued to shared Mailboxes, under "Microsoft Graph" you must also add the permissions "MailboxSettings"-> "MailboxSettings.Read" and under "APIs my organization uses" -> "Office 365 Exchange Online" -> "Application permission" -> "Exchange"-> "Exchange.ManageAsApp".
13. Click "Add permissions"
3.1.4 Adding groups as an optional claim
To verify the user permissions, certEntra requires the configuration of claims of the app registration in Azure. You must add groups as an optional claim to your app registration in Azure. For this, you must navigate to the created app registration in Azure and go to "Manage" -> "Token configuration". There, you must select "Add groups claim", select "Security groups" and press "Add". If you have more than 200 Entra ID groups, it would be recommended to select the option "Groups assigned to the application" and assign the group to the application in the "Users and Groups" selection from the "Enterprise applications" list (see Manage users and groups assignment to an application - Microsoft Entra ID | Microsoft Learn).

3.2 Configure role groups
3.2.1 Administrator group
To create the administrator group that is privileged to administrate and configure certEntra:
1. Go to your Azure portal, search for "Entra ID" and click on "Groups"
2. Click "New group"
3. Select "Group type" Security, give the group a "Group name" and optionally a "Group description"
4. Select the "Owners" and the "Members" of the group
5. Click "Create"
6. Go to "All groups" and copy the "Object Id" of the group created. It is required during step 4.
3.2.2 KRA group
To configure the key recovery agent group for key recovery operations:
1. Click "New group"
2. Select "Group type" Security, give the group a "Group name" and optionally a "Group description"
3. Select the "Owners" and the "Members" of the group
4. Click "Create"
5. Go to "All groups" and copy the "Object Id" of the group created. It is required during step 4.
3.2.3 Enrollment groups
Each certificate template configured in certEntra requires a certificate enrollment group in Entra ID that contains the users certEntra will issue certificates for. To create one of these groups in Entra ID do the following:
1. Click "New group"
2. Select "Group type" Security, give the group a "Group name" and optionally a "Group description"
3. Select the "Owners" and the "Members" of the group
4. Click "Create"
4 Deployment
4.1 Azure ARMv2 Template Deployment
The ARM template must be executed in a windows powershell session. The powershell version 7+ is supported.
1. Please install Azure CLI as described in Install the Azure CLI on Windows | Microsoft Learn. Ensure that the Azure CLI version is 2.80.0 or later. To verify the installed version restart powershell:
az version
2. Login as the global administrator in the Azure CLI session:
az login
3. List available subscriptions and target your desired subscripton
 az account list --output table
az account set --subscription "<subscription-name-or-id>"
4. Verify the active subscription
az account show
5. Determine the Azure region name for the resource group, for example "northeurope"
az account list-locations --output table
6. Create a resource group in your preferred Azure region
az group create -n <certentra-rg-name> -l <azure-region-name>
7. Invoke the ARM template (you can find a list of generated resources in Appendix B)
az deployment group create --resource-group "<certentra-rg-name>" --
template-uri https://secardeo.blob.core.windows.net/certentra/mainTemplate.json
8. When promted, provide values for the following deployment parameters:
a. "webAppName": the name of the webapp
b. "appServiceSku": the app service plan SKU. Use either "B1", "P0v3" or "P1v3". See Appendix A) for reference on the platform requirements.
c. "keyVaultName": the name of the Key Vault being created. Please avoid special characters like _<>*%&:\/?
d. "certEntraAdminGroup": the "Object ID" of the administrator group configured in section 3.2.1
e. "certEntraKRAGroup": the "Object ID" of the KRA group configured in the section 3.2.2
f. "appRegistrationDisplayName": the name of the app registration being created.
g. "applicationPackageUrl": The URL of the deployed certEntra application package (.zip) you received from Secardeo
9. After entering the required values, your web app will be deployed (~5 min)
10. Once the deployment is complete, you can review the created resources by opening the Azure portal and selecting "Resource groups".
4.2 Azure Marketplace deployment
After locating certEntra in the Azure Marketplace, select the certEntra offer and click "Create".
4.2.1 Basics
The first page contains the general Azure deployment settings:
1. Select your Azure subscription
2. Select an existing resource group or create a new one
3. Select the Azure region
4. Enter the name of the Web App. The default public hostname will be created by Azure as <webapp-name>.azurewebsites.net
5. Click "Next"

4.2.2 App Service Configuration
On this page, configure the App Service hosting settings:
1. Enter the name of the App Service Plan
2. Select the pricing tier of the App Service Plan. See Appendix A) for reference on the recommended platform requirements
3. Enter the package URL of the certEntra deployment ZIP file
4. Click "Next"

4.2.3 Key vault & app registration
1. Choose your desired key vault SKU. Select "Standard" for a non-HSM key vault. For an HSM-backed key vault, select "Premium".
2. Choose a globally unique name for your key vault. Ensure that the name does not match the name of your Web App. Please avoid special characters like _<>*%&:\/?
3. Enter the Client ID of your app registration created in step 3.1.1
4. Enter the Client Secret of your app registration in step 3.1.1
5. Confirm the Client Secret of your app registration
6. Enter your Tenant ID
7. Enter the Object ID of the Enterprise Application (service principal). You can find this in the Azure portal under "Enterprise Applications", then search for the app registration created in step 3.1.1 and copy its "Object ID"
8. Click "Next"
4.2.4 Entra ID Configuration
On this page, configure the certEntra authorization groups:
1. Select the certEntra Administrators groups "Object Id" of the group configured in step 3.2.1
2. Select the certEntra KRA groups "Object Id" of the group configured in step 3.2.2
3. Click "Next"
4.2.5 Review + create
After entering the required values, review the configuration and click "Create". This deployment will create the certEntra Azure Web App and the required Azure resources such as:
- Azure Service Plan
- Web App
- Key Vault
- Virtual Network and subnets
- Log Analytics workspace
- Data Collection Endpoint and Data Collection Rule
- Required role assignments for the Web App and the provided Enterprise Application
The deployment typically takes about 5 minutes. After the deployment has been completed
1. Click "Go to resource"
2. Open the created resource group or Web App
3. In the deployment outputs, note the FQDN of the application
4. Open https://<FQDN>/certEntra to access certEntra
4.3 Terraform Deployment
The Terraform configuration must be executed in a Windows PowerShell session. Ensure that Terraform is installed and that you are authenticated to the target Azure tenant and subscription.
1. Install Terraform as described in Install | Terraform | HashiCorp Developer. To verify the installed version, restart Powershell and run:
terraform version
2. Login to Azure:
az login
3. List available subscriptions and target your desired subscription:
 az account list --output table
az account set --subscription "<subscription-name-or-id>"
4. Verify the active subscription
az account show
5. Download the certEntra Terraform deployment package and extract it
 Invoke-WebRequest -Uri "https://secardeo.blob.core.windows.net/certentra/certEntra-Terraform.zip" -OutFile "certEntra-Terraform.zip"
Expand-Archive -Path ".\certEntra-Terraform.zip" -DestinationPath ".\certEntra-Terraform"
cd .\certEntra-Terraform
6. Determine the Azure region code for the deployment, for example "northeurope"
az account list-locations --output table
7. Review and update the Terraform variable values in terraform.tfvars or provide them as input variables. Ensure that the required values are set, including:
a. resource_group_name: the name of the resource group
b. location: the Azure region name
c. web_app_name: the name of the web app
d. app_service_sku: the app service plan SKU. Use either "B1", "P0v3" or "P1v3". See Appendix A) for reference on the platform requirements.
e. key_vault_name: the name of the Key Vault being created. Please avoid special characters like _<>*%&:\/?
f. admin_group_object_id: the Object ID of the administrator group configured in section 3.2
g. kra_group_object_id: the Object ID of the KRA group configured in section 3.2
h. application_package_url: the URL of the deployed certEntra application package (.zip)
8. Initialize the terraform working directory:
terraform init
9. Review the execution plan:
terraform plan
10. Apply the terraform configuration
terraform apply
11. After entering the required values and confirming the deployment, the certEntra infrastructure will be deployed. The deployment typically takes about 5 minutes.
5 Post deployment configuration
5.1 Azure Marketplace deployment specific configuration
Next enable Entra ID Authentication for certEntra.
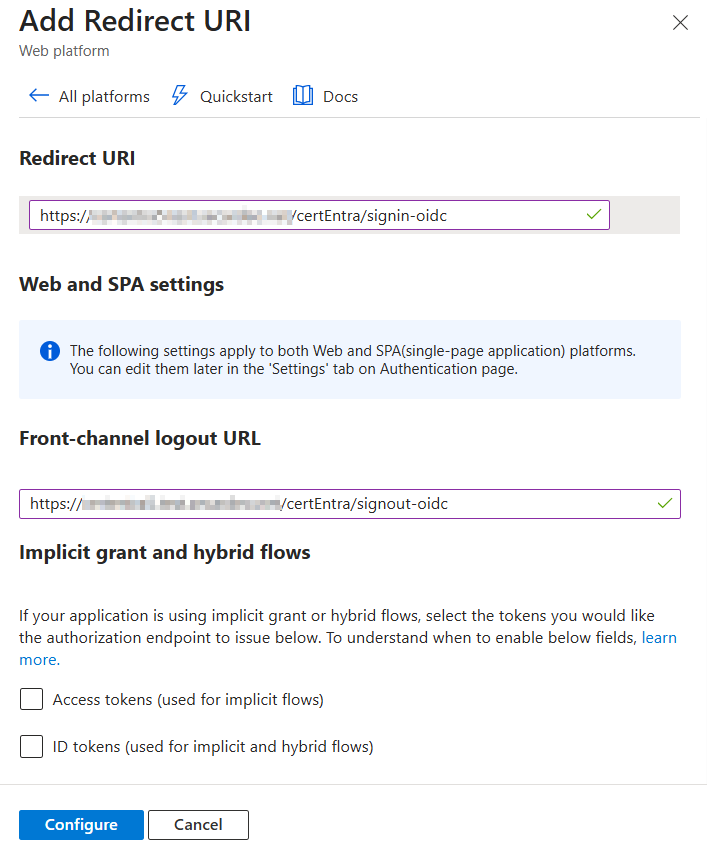
1. In the Azure portal, open the configuration of your app registration and click on "Manage->Authentication".
2. Click "Add Redirect URI"
3. Choose "Web"

4. Enter https://<FQDN>/certEntra/signin-oidc ("<FQDN>" is the domain name of your app service) at "Redirect URI"
5. Enter https://<FQDN>/certEntra/signout-oidc ("<FQDN>" is the domain name of your app service) at "Front-channel logout URL"
6. Click "Configure"
5.2 Grant app registration API permissions
Next grant the app registration API permissions.
1. In the Azure portal, open the configuration of your app registration and click on "Manage->API permissions".
2. Click "Grant admin consent for <your-company-name>"

3. In the Azure portal, open the certEntra app service and click "Restart"

5.3 Configure Exchange Online permissions
In case you are either:
- Issuing certificates for shared mailboxes
- Pushing user certificates to the GAL
Please make sure to configure the appropriate permissions:
1. Download the Powershell script to configure permissions using the following Powershell command as administrator:
Invoke-WebRequest -Uri "https://secardeo.blob.core.windows.net/certentra/Set-CertEntraExchangeRbac.ps1" -OutFile "Set-CertEntraExchangeRbac.ps1"
2. Install the Exchange-Online powershell module, if not installed already
Install-Module ExchangeOnlineManagement -Scope CurrentUser
3. Invoke the script and login with a global administrator/exchange administrator user. Please insert the "AppId" and "ObjectId" (you can find them in the Azure Portal under "Enterprise Applications" -> select the created application). This script will create a new service principal and assign required Exchange Online permissions. Replace <ServicePrincipalDisplayName> with a new name for this service principal.
./Set-CertEntraExchangeRbac.ps1 -AppId "<AppId>" -ServicePrincipalObjectId "<ObjectId>" -DisplayName "<ServicePrincipalDisplayName>"
5.4 Database configuration
5.4.1 Create database server
certEntra requires a database server. There are different options for deploying the database:
- Managed (recommended): Deploy a fully managed database server in Azure (e.g.
Azure SQL or Azure Database for MySQL). This is recommended for production use due to easier maintenance, backups and high availability
- Self-hosted: You can use your own existing database server (for example, an on- premises MS SQL Server or MySQL server that you manage)
If you choose the Managed option and don't have an already existing database server yet, we suggest to create one in your Azure Tenant. You can choose between Azure SQL or MySQL.
5.4.1.1 Create managed Azure SQL server
1. In the Azure portal, search for "SQL servers" in the top search bar.
2. Click "Create" and enter a globally unique server name, such as "topki-sqlserver".
3. Under "Basics -> Authentication method", choose the option that fits your setup:
a. "Use Microsoft Entra-only authentication" (see 5.4.3)
b. "Use both SQL and Microsoft Entra authentication", or
c. "Use SQL authentication" Note: SQL authentication is often easier to configure, however Microsoft Entra authentication is recommended
4. Please decide the database administrator. Configure the "Microsoft Entra admin" and/or "Instance admin login" depending on the selection of the "Authentication method".
a. If you want to use SQL authentication, you must create a new user with a password that will be set as the administrator of the database. Please remember the credentials of the "Instance admin login" to create an additional database user for certEntra. This is required in the database configuration step in the certEntra manual.
b. If you choose "Microsoft Entra authentication", you must configure an Entra ID account that will be set as the administrator of the database server. If you want to configure Entra authentication as a login option, you must be able to login as the "Microsoft Entra admin" at the database server (see chapter 5.4.2).
5. In the "Networking" tab, toggle "Allow Azure services and resources to access this server" to "Yes".
6. In the "Security" tab, you don't need to configure anything
7. Configure the rest of the attributes according to your needs or leave them with the default
8. Click "Review + Create" and "Create"
9. After the database server is deployed, click on the database server. Go to "Security" -> "Networking" and configure the networking. The database server must be accessible from the certEntra web app and also in step 5.4.2, if you want to use Entra authentication.
5.4.1.2 Create managed MySQL server
1. Go to your Azure portal and search for "Azure Database for MySQL servers".
2. Click "Create" and enter a server name, e.g. "TOPKI".
3. For "Authentication method", choose at least "Use SQL authentication". certEntra does not support Microsoft Entra authentication for MySQL databases.
4. Configure a "Server admin login" and password. This is the database administrator. Please remember the credentials. They are required in the database configuration step in the certEntra manual.
5. In the "Networking" tab toggle "Allow Azure services and resources to access this server" to "Yes".
6. Configure the rest of the attributes according to your needs or leave the with the default.
5.4.2 Database network configuration
5.4.2.1 Private endpoint
To connect certEntra with the database, the database must be integrated into the virtual network using a private endpoint.
1. In the Azure portal, open your SQL server
2. Navigate to "Security"->"Networking"
3. Select the "Private access" tab and click "Create a private endpoint"

4. In the "Basics" tab:
a. Select the correct subscription and the certEntra resource group
b. "Name": Provide a name (e.g. pe-certentra-sql)
c. "Region": select the region of the certEntra resource group
d. Click "Next: Resource"
5. In the "Resource" tab:
a. "Target sub-resource": "sqlServer"
b. Click "Next: Virtual Network"
6. In the "Virtual Network" tab:
a. "Virtual network": Select the vnet-certentra virtual network created by the ARM template or Terraform deployment
b. "Subnet": select the subnet-private-endpoints subnet created by the ARM template or Terraform deployment
c. Click "Next: DNS"
7. In the "DNS" tab:
a. Integrate with private DNS zone: select "Yes"
8. Click "Next: Tags", "Next: Review + create" and "Create" to create the private endpoint
5.4.2.2 Public endpoint (additionally required for Entra authentication)
Under "Security - Networking - Public access - Firewall rules" click "Add your client IP address". Press "Save". (You can remove this after the deployment is finished)
5.4.3 Configure Entra authentication for Azure SQL (Recommended)
certEntra can connect to Azure SQL databases using Entra Authentication via the app registration. Alternatively you can use SQL authentication to connect to the previously configured DB server. For this, the app registration user has to be created with proper permissions on the database server. For more information, please refer to the Microsoft documentation.
1. Go to the Azure portal to "Enterprise applications" -> "All applications"
2. Select the app registration configured in chapter 3.1.1
3. Copy the "Object ID"
4. Go in the Azure portal to "Azure SQL" and select the Azure SQL database server to get the "Microsoft Entra admin" account
5. Login to the database server as the "Microsoft Entra admin". You can use "Microsoft SQL Server Management Studio"
6. Create the external user for the app registration on the database server based on the "Object ID":
 CREATE USER [<name-of-app-registration>]
FROM EXTERNAL PROVIDER
WITH OBJECT_ID = '<object-id>'; GO
 ALTER ROLE dbmanager ADD MEMBER [<name-of-app-registration>];
ALTER ROLE loginmanager ADD MEMBER [<name-of-app-registration>];
Note: The "[" and "]" symbols are required and must not be removed.
7. You can validate that the user was successfully created:
 SELECT name, type_desc, authentication_type_desc
FROM sys.database_principals
WHERE type IN ('E', 'X')
AND name = '<name-of-app-registration>';
5.5 Optional configuration
5.5.1 Custom domain name
The deployed certEntra web app automatically receives a default domain name. To configure a custom domain name, please refer to the Microsoft documentation: https://learn.microsoft.com/en-us/azure/app-service/app-service-web-tutorial-custom-domain Please make sure you have the necessary rights at your DNS provider for your custom domain name.
5.5.2 Enable Application Insights logging
During deployment, certEntra automatically provisions the required Azure Monitor resources for centralized logging, including the Log Analytics workspace and related data collection resources. If Application Insights should be used for additional application monitoring, it must be enabled manually in the Azure portal after the deployment has completed. To do this:
- Open the Azure portal, search for "App Services" and select your certEntra Web App
- Open "Monitoring" -> "Application Insights"
- Select "Enable"
- Under "Change your resource", select "Create new resource"
- Enter a resource name for the new Application Insights resource
- Select the Log Analytics Workspace that was created during the certEntra deployment
- Press "Apply"
5.5.3 Disable automatic software updates
Per default, certEntra automatically updates itself to the newest released version. If you want to disable the automatic software update, please contact support@secardeo.com.
6 certEntra configuration
Now, the deployment of certEntra is completed and you can proceed with the certEntra configuration. For this, open your web browser and enter the URL https://<FQDN>/certEntra. You can find the FQDN under "App Services - <name-of-app-registration> - overview - default name. The configuration of certEntra is described in the certEntra manual. The following data have to be provided to configure certEntra:
- The app registration is created and configured
- certEntra is installed
- The connection parameters for the backend CA (FQDN or IP of CA server and name of the CA and CA credentials)
- The Entra ID groups (administrator group, KRA group, enrollment groups)
- For setting up the database connection:
- FQDN or IP of the SQL server
- The corresponding port of the SQL server
- The database name
- Credentials for accessing the database (username and password; user must have read and write permissions)
- For e-mail notifications (Exchange Online):
- Permissions for the app registration
- E-mail address of originator and recipient (operator)
- For e-mail notifications (SMTP):
- DNS name of the mail server
- E-mail address of originator and recipient (operator)
- Optional: username and password for mail server authentication
- Depending on the SMTP server the firewalls must allow the port 25, 465 or 587.
Please check with your mail server administrator for the correct port
- Consider for each certificate status, who should receive an e-mail regarding the status change
7 Contact
Secardeo GmbH
Hohenadlstr. 4
D-85737 Ismaning
Germany
E-Mail: support@secardeo.com
Phone: +49 89 18 93 58 9-8
8 Appendix
8 Appendix
A) Platform requirements
The target environment must meet the following technical requirements.
Web App Requirements
- Azure app service plan SKU: B1 for testing purposes
- P0v3 for production use with approximately 100 users/active certificates
- P1v3 for production use with more than approximately 1000 users/active certificates
B) ARM template resources
The following resources are created by the ARM template:
| Type | Description |
|---|---|
| Microsoft.Network/virtualNetworks | Creates the virtual network for the deployment, including a delegated subnet for App Service VNet integration and a separate subnet for private endpoints. |
| Microsoft.KeyVault/vaults | Creates the Azure Key Vault used to store deployment secrets and certificate-related values. |
| Microsoft.Resources/deploymentScripts | Runs an Azure PowerShell deployment script that creates or reuses the Key Vault certificate certentra-auth and returns its public key and validity data for the app registration. |
| Microsoft.ManagedIdentity/userAssignedIdentities | Creates a user-assigned managed identity used by the deployment script. |
| Microsoft.Web/serverfarms | Creates the Azure App Service plan for the certEntra Web App. |
| Microsoft.Web/sites | Creates the Azure Web App with a system-assigned managed identity and basic site configuration. |
| Microsoft.Web/sites/config | Configures the Web App application settings, including Key Vault references, Entra group settings, package deployment URL, and logging ingestion settings. |
| Microsoft.Web/sites/networkConfig | Configures VNet integration for the Web App by connecting it to the delegated subnet. |
| Microsoft.Graph/applications@v1.0 | Creates the Entra ID app registration used by certEntra, including redirect URIs, group claims, certificate-based credentials, and required Microsoft Graph/API permissions. The same resource type is also used to append the service principal as an owner of the application. |
| Microsoft.Graph/servicePrincipals@v1.0 | Creates the service principal for the app registration. |
| Microsoft.KeyVault/vaults/secrets | Creates Key Vault secrets for AzureAd--ClientId and AzureAd--TenantId. |
| Microsoft.OperationalInsights/workspaces | Creates the Log Analytics workspace used for certEntra logging. |
| Microsoft.OperationalInsights/workspaces/tables | Creates the custom Log Analytics table certEntraLogs_CL for application log records. |
| Microsoft.Insights/dataCollectionEndpoints | Creates the data collection endpoint used for log ingestion. |
| Microsoft.Insights/dataCollectionRules | Creates the data collection rule that maps the custom log stream into the Log Analytics workspace. |
| Microsoft.Authorization/roleAssignments | Assigns Azure roles required by the deployment. In the current template this is used multiple times for: Key Vault Certificates Officer on the Key Vault for the deployment identity, Monitoring Metrics Publisher, Web Plan Contributor and Website Contributor on the resource group for the app registration service principal, Key Vault Secrets User for the Web App identity, and Log Analytics Reader on the workspace. |
C) Marketplace template resources
The following resources are created by the Marketplace deployment:
| Type | Description |
|---|---|
| Microsoft.Network/virtualNetworks | Creates the virtual network for the deployment, including a delegated subnet for App Service VNet integration and a separate subnet for private endpoints. |
| Microsoft.KeyVault/vaults | Creates the Azure Key Vault used to store deployment secrets and certificate-related values. |
| Microsoft.Web/serverfarms | Creates the Azure App Service plan for the certEntra Web App. |
| Microsoft.Web/sites | Creates the Azure Web App with a system-assigned managed identity and basic site configuration. |
| Microsoft.Web/sites/networkConfig | Configures VNet integration for the Web App by connecting it to the delegated subnet. |
| Microsoft.KeyVault/vaults/secrets | Creates Key Vault secrets for AzureAd--ClientId, Azure--ClientSecret and AzureAd--TenantId based on the manually provided app registration values. |
| Microsoft.OperationalInsights/workspaces | Creates the Log Analytics workspace used for certEntra logging. |
| Microsoft.OperationalInsights/workspaces/tables | Creates the custom Log Analytics table certEntraLogs_CL for application log records. |
| Microsoft.Insights/dataCollectionEndpoints | Creates the data collection endpoint used for log ingestion. |
| Microsoft.Insights/dataCollectionRules | Creates the data collection rule that maps the custom log stream into the Log Analytics workspace. |
| Microsoft.Authorization/roleAssignments | Assigns Azure roles required by the deployment. In the current template this is used multiple times for: Key Vault Certificates Officer on the Key Vault for the deployment identity, Monitoring Metrics Publisher, Web Plan Contributor and Website Contributor on the resource group for the app registration service principal, Key Vault Secrets User for the Web App identity, and Log Analytics Reader on the workspace. |